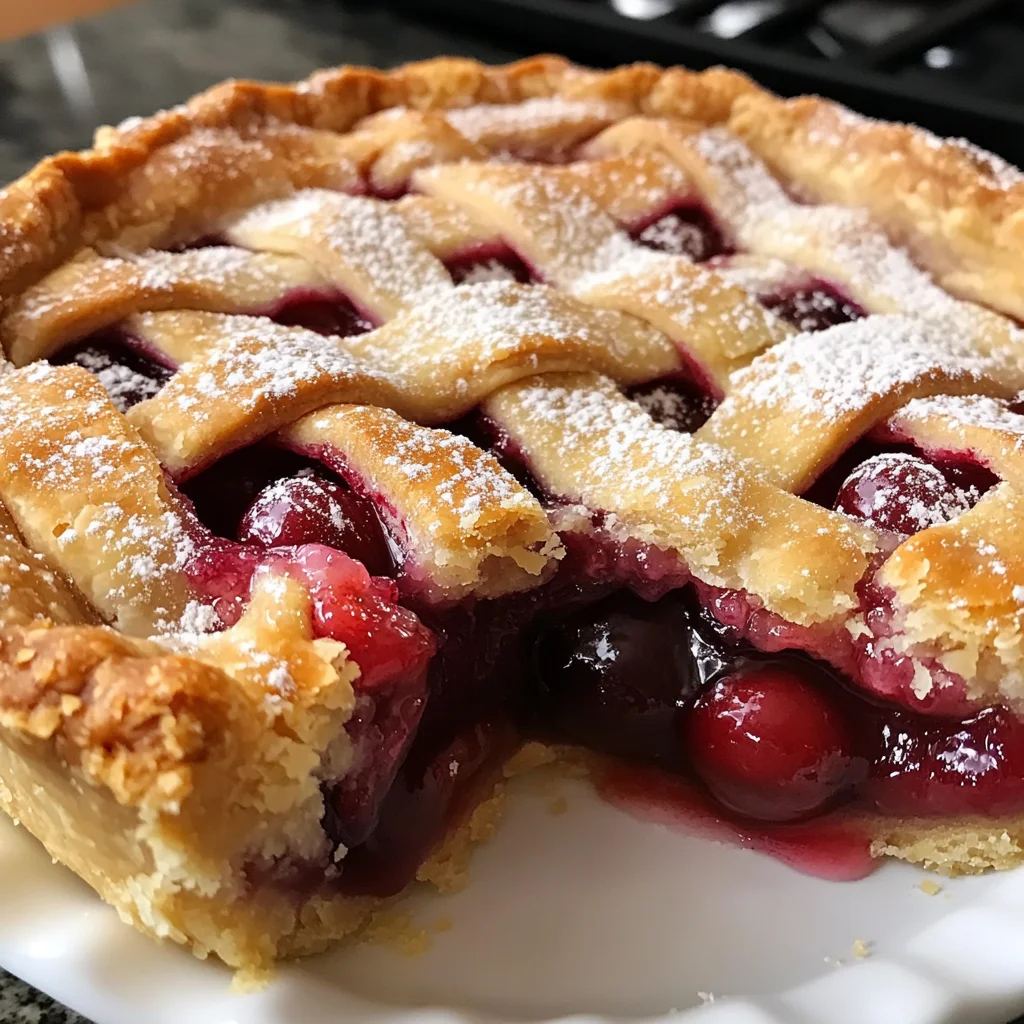
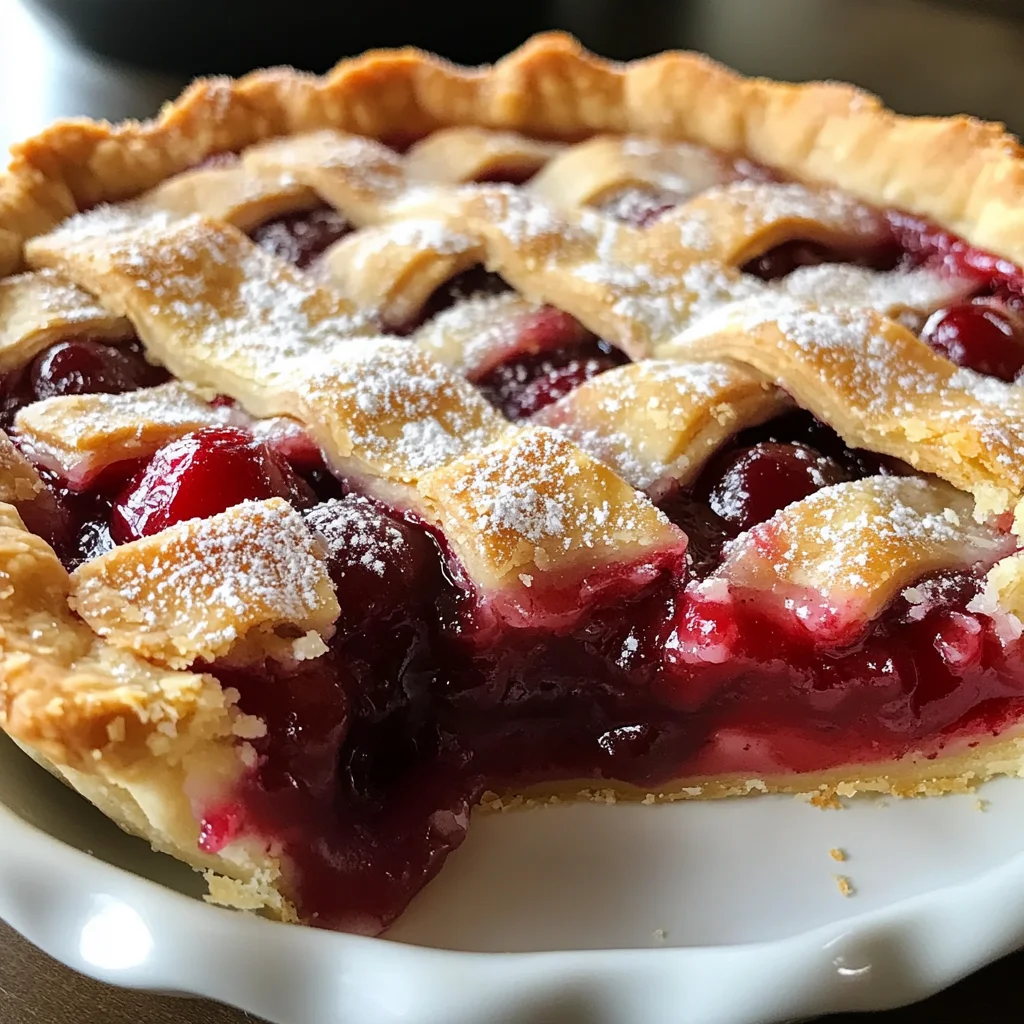
Crazy Crust Pie Dessert
If you’re looking for a dessert that will wow your family and friends, you’ve come to the right place! The Crazy Crust Pie Dessert is one of those magical recipes that combines a unique crust with delightful cherry pie filling, creating a surprising taste experience. This recipe is perfect for busy weeknights or family gatherings, bringing smiles to everyone’s faces as they savor each bite. Trust me; once you try it, you’ll be adding this to your list of favorites!
Why You’ll Love This Recipe
- Effortless Preparation: This dessert comes together quickly, making it ideal for both novice and experienced bakers alike.
- Family-Friendly Delight: With its sweet cherry filling and soft crust, this pie appeals to both kids and adults—everyone will want a slice!
- Make-Ahead Convenience: You can prepare this pie in advance, letting the flavors meld beautifully while saving you time on the day of your gathering.
- Irresistible Flavor: The combination of buttery crust and luscious cherry filling creates an unforgettable taste that keeps everyone coming back for more.
Ingredients You’ll Need
You’ll find that the ingredients for this Crazy Crust Pie Dessert are simple and wholesome. They come together easily to create a wonderfully delicious treat. Here’s what you’ll need:
- 125 grams all-purpose flour
- 1 teaspoon baking powder
- 1/4 teaspoon kosher salt
- 113 grams salted sweet cream butter, softened
- 67 grams granulated sugar
- 1/2 teaspoon pure vanilla extract
- 1 extra-large egg, room temperature
- 180 millilitres half and half
- 595 grams canned cherry pie filling
- 2 teaspoons coarse sanding sugar, for garnish
Variations
One of the best things about the Crazy Crust Pie Dessert is its flexibility! You can easily make it your own with these fun variations:
- Change the Fruit Filling: Swap out the cherry pie filling for blueberry or peach to give your pie a different fruity twist.
- Experiment with Extracts: Try almond or lemon extract instead of vanilla for a unique flavor profile that adds a special touch.
- Add Some Crunch: Sprinkle chopped nuts like pecans or walnuts on top before baking for an added crunch and nutty flavor.
- Top it Off: Serve with whipped coconut cream or dairy-free ice cream on the side for an extra layer of deliciousness.
How to Make Crazy Crust Pie Dessert
Step 1: Preheat Your Oven
Start by preheating your oven to 190°C. Getting the oven ready ensures that your pie bakes evenly and achieves that lovely golden brown crust we all crave!
Step 2: Mix Dry Ingredients
In a small bowl, whisk together 125 grams all-purpose flour, 1 teaspoon baking powder, and 1/4 teaspoon kosher salt. Mixing these dry ingredients helps distribute the baking powder evenly throughout, which is crucial for achieving a nice rise in the crust.
Step 3: Cream Butter and Sugar
In a medium mixing bowl, beat the softened 113 grams salted sweet cream butter using a handheld mixer on medium-high speed for about 1 minute until creamy. Then add in 67 grams granulated sugar and 1/2 teaspoon pure vanilla extract. Continue beating for another 1 to 1.5 minutes until everything is well integrated. This step adds air into the mixture, which contributes to the lightness of your crust!
Step 4: Incorporate Egg
Now it’s time to reduce the mixer speed to low. Add in your extra-large egg (make sure it’s at room temperature!) and beat until fully blended. This helps bind all those lovely ingredients together without leaving any streaks behind.
Step 5: Combine Dry Ingredients
Next, add in your dry flour mixture from earlier. Increase the mixer speed to medium and mix until everything comes together smoothly. This step ensures that no dry bits remain—an important part of making sure each slice has that great texture!
Step 6: Add Half and Half
Continue mixing on medium speed while gradually drizzling in 180 millilitres half and half. Mix just until fully incorporated; this creamy addition gives richness to our batter, making every bite delightful.
Step 7: Prepare Your Pie Plate
Lightly coat a 23-centimetre deep-dish pie plate with baker’s spray. This helps prevent sticking so you can serve beautiful slices without any fuss!
Step 8: Assemble Your Pie
Spoon all but about 2 to 3 tablespoons of batter around the outer edges of your pie plate while smoothing out a thin layer in the center.
Step 9: Fill with Cherry Goodness
Spoon your 595 grams canned cherry pie filling into the center of your batter base, ensuring there’s still space around the edges (about 2.5 centimeters). Dollop reserved batter on top of that luscious filling—it creates such an appealing look when baked!
Step 10: Sprinkle Some Sugar
Sprinkle some coarse sanding sugar evenly over the top before placing it in the oven. This little touch gives it a sparkling finish that’s simply irresistible!
Step 11: Bake It Up!
Bake your creation for about 35 to 40 minutes or until you see that beautiful golden brown crust forming. Your kitchen will smell heavenly—it’s hard not to sneak a peek!
Step 12: Cool Before Serving
Finally, allow your Crazy Crust Pie Dessert to cool in its dish before slicing into it. Patience pays off here; letting it cool helps it set up nicely so each slice holds together perfectly when served.
Enjoy every delicious bite!
Pro Tips for Making Crazy Crust Pie Dessert
Creating a Crazy Crust Pie Dessert is a breeze with these handy tips to ensure your pie comes out perfectly every time!
-
Use room temperature ingredients: Bringing your egg and butter to room temperature helps create a smoother batter and ensures even mixing, leading to a fluffier crust.
-
Don’t overmix the batter: Once you’ve added the flour mixture and half and half, mix just until combined. Overmixing can result in a tough texture instead of the light, tender crust we aim for.
-
Keep an eye on baking time: Ovens can vary, so start checking your pie at the 30-minute mark. You want that golden brown crust, but be cautious not to overbake it!
-
Let it cool completely: Patience is key! Allowing the pie to cool in the dish lets the filling set properly, making slicing easier and ensuring each piece holds its shape.
-
Experiment with fillings: While cherry pie filling is delightful, feel free to swap it out with other fruit fillings like blueberry or peach for a fun twist on this classic dessert.
How to Serve Crazy Crust Pie Dessert
Presenting your Crazy Crust Pie Dessert beautifully will make it even more inviting for your guests. Here are some ideas on how to serve this delicious treat!
Garnishes
- Whipped cream: A dollop of whipped cream adds a light, fluffy touch that complements the richness of the pie.
- Fresh cherries or berries: Toss some fresh cherries or mixed berries on top for a pop of color and freshness.
- Mint leaves: A few sprigs of mint can brighten up the presentation and add an aromatic element to each slice.
Side Dishes
- Vanilla ice cream: A scoop of creamy vanilla ice cream pairs beautifully with warm pie, creating a classic dessert experience.
- Fruit salad: A vibrant fruit salad brings lightness and balance to the sweetness of the pie, making for a refreshing side.
- Yogurt parfait: Layered yogurt with granola and fruits can serve as a delightful contrast in texture while keeping things light.
- Coffee or tea: Offering coffee or herbal tea alongside your dessert enhances the flavors and provides a nice ending to any meal.
With these serving suggestions, your Crazy Crust Pie Dessert will not only taste amazing but look fabulous too! Enjoy every bite!
Make Ahead and Storage
This Crazy Crust Pie Dessert is not only delicious but also perfect for meal prep! You can easily make it ahead of time or store leftovers for later enjoyment.
Storing Leftovers
- Store any leftover pie in an airtight container at room temperature for up to 2 days.
- If you prefer, refrigerate the pie to extend its freshness for up to a week.
Freezing
- To freeze, allow the pie to cool completely after baking.
- Wrap it tightly in plastic wrap and then in aluminum foil to prevent freezer burn.
- It can be frozen for up to three months. Just remember to label it with the date!
Reheating
- Thaw the pie overnight in the refrigerator if frozen.
- Reheat slices in a microwave for about 20-30 seconds or until warm.
- For a crispy crust, place slices in a preheated oven at 180°C for about 10 minutes.
FAQs
Here are some common questions you might have about this delicious dessert.
What makes the Crazy Crust Pie Dessert special?
The Crazy Crust Pie Dessert is unique because it features a delightful crust that forms while baking. The batter separates during cooking, creating a beautifully textured crust around a luscious cherry filling.
Can I use fresh cherries instead of canned filling for the Crazy Crust Pie Dessert?
Absolutely! Fresh cherries can be used, but you’ll need to add some sugar and cornstarch to help thicken the filling as it cooks. This will give you a fresh twist on the classic recipe!
How can I customize my Crazy Crust Pie Dessert?
Feel free to experiment with different fruit fillings such as blueberry, peach, or even apple! Just ensure that the total amount remains similar to what’s suggested in the recipe.
Is there a way to make this recipe gluten-free?
Yes! You can substitute all-purpose flour with a gluten-free flour blend. Just make sure it contains xanthan gum or add some separately to achieve the right texture.
Can I make Crazy Crust Pie Dessert without eggs?
You can replace the egg with a flaxseed meal or chia seed mixture (1 tablespoon of flaxseed meal or chia seeds mixed with 2.5 tablespoons of water) for binding purposes.
Final Thoughts
I hope you enjoy making this delightful Crazy Crust Pie Dessert as much as I do! It’s perfect for gatherings or simply treating yourself on a cozy evening at home. The combination of textures and flavors will surely bring smiles all around. Happy baking, and don’t forget to share your delicious creations!
Crazy Crust Pie Dessert

Indulge in the delightful Crazy Crust Pie Dessert—a unique recipe that combines a light, buttery crust with a luscious cherry filling, creating a sweet treat that will enchant your family and friends. This easy-to-make dessert is perfect for any occasion, from busy weeknights to festive gatherings. The beauty of this pie lies not only in its taste but also in its effortless preparation, making it suitable for bakers of all skill levels. With a few simple ingredients and clear instructions, you can whip up this crowd-pleaser in no time. Each slice offers a burst of flavor and texture that keeps everyone coming back for more!
- Prep Time: 15 minutes
- Cook Time: 40 minutes
- Total Time: 55 minutes
- Yield: Serves approximately 8 slices 1x
- Category: Dessert
- Method: Baking
- Cuisine: American
Ingredients
- 125 grams all-purpose flour
- 1 teaspoon baking powder
- 1/4 teaspoon kosher salt
- 113 grams salted sweet cream butter, softened
- 67 grams granulated sugar
- 1/2 teaspoon pure vanilla extract
- 1 extra-large egg, room temperature
- 180 millilitres half and half
- 595 grams canned cherry pie filling
- 2 teaspoons coarse sanding sugar, for garnish
Instructions
- Preheat your oven to 190°C.
- In a small bowl, whisk together the flour, baking powder, and salt.
- In a medium bowl, beat the softened butter until creamy. Add sugar and vanilla, mixing well.
- Lower the mixer speed and incorporate the egg until blended.
- Gradually add the dry mixture to the wet mixture until smooth.
- Drizzle in half and half while mixing on medium speed until fully combined.
- Lightly coat a deep-dish pie plate with baker's spray.
- Spoon most of the batter into the edges of the pie plate and smooth out the center.
- Fill with cherry pie filling and dollop reserved batter on top.
- Sprinkle coarse sanding sugar over everything before baking.
- Bake for 35 to 40 minutes or until golden brown.
- Allow cooling before slicing.
Nutrition
- Serving Size: 1 slice (approximately 90g)
- Calories: 360
- Sugar: 18g
- Sodium: 180mg
- Fat: 22g
- Saturated Fat: 12g
- Unsaturated Fat: 10g
- Trans Fat: 0g
- Carbohydrates: 38g
- Fiber: 1g
- Protein: 5g
- Cholesterol: 60mg