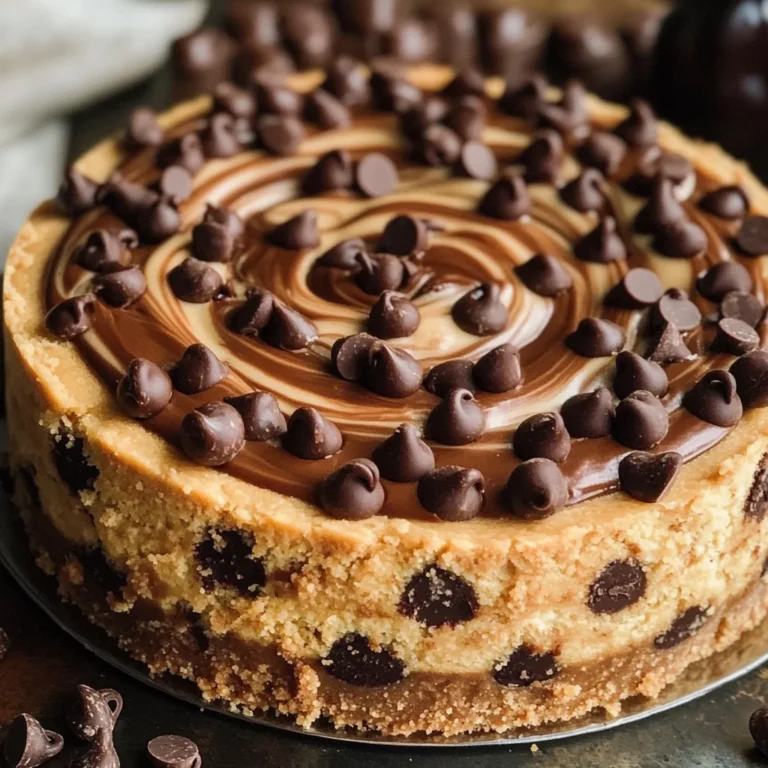
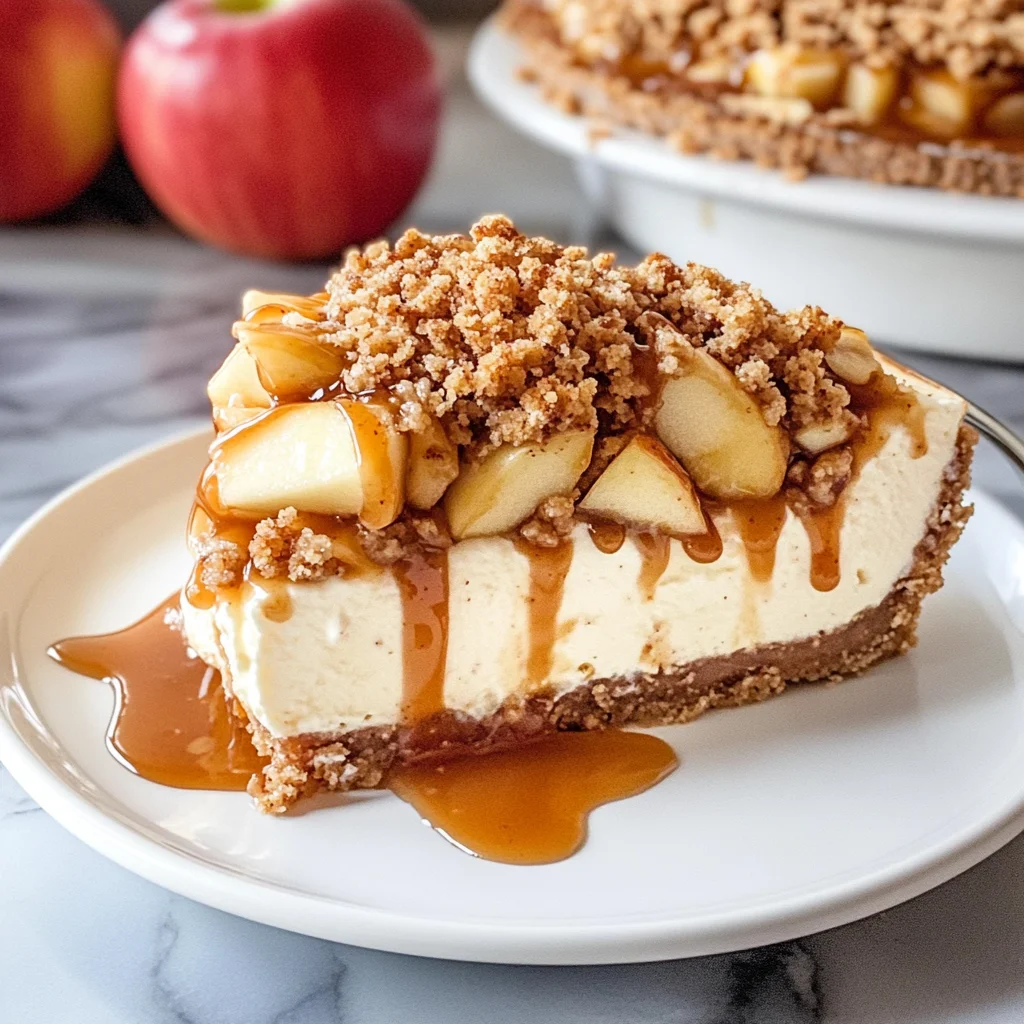
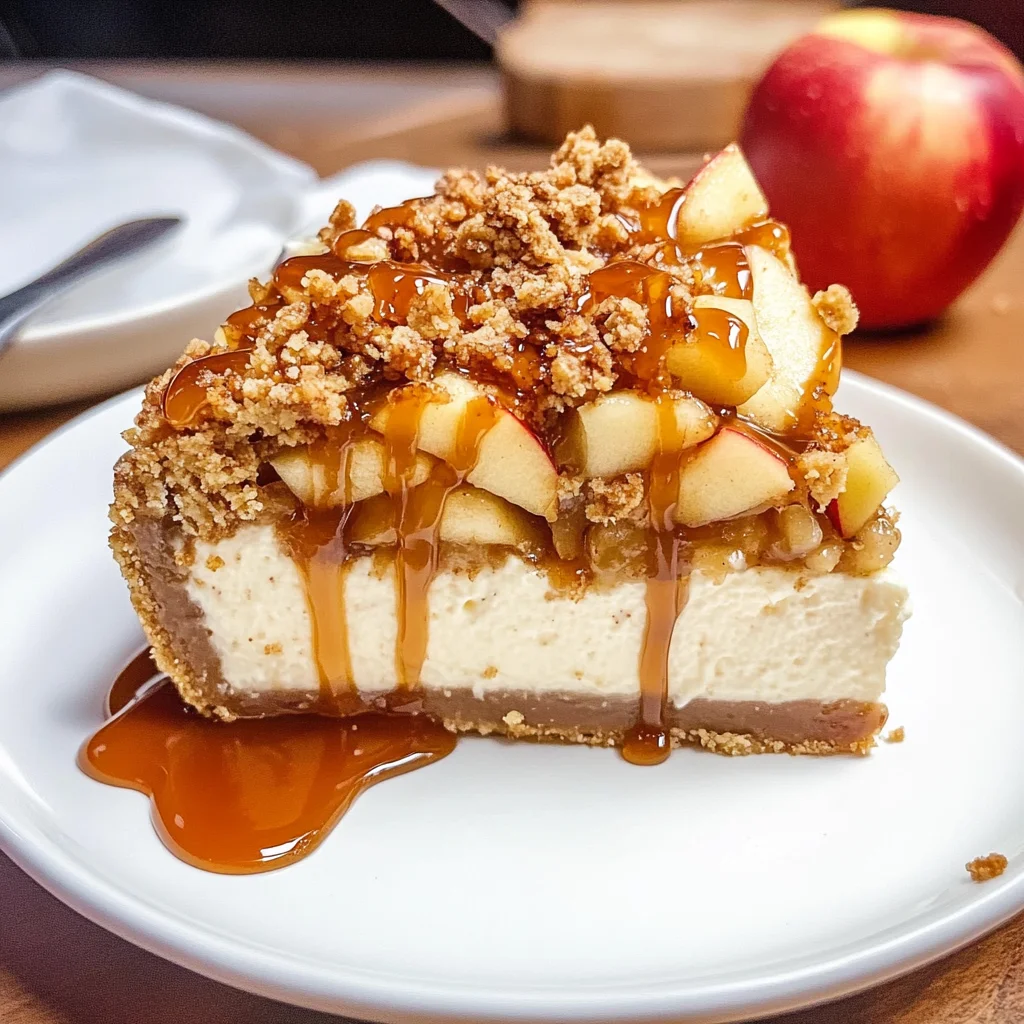
Apple Crisp Cheesecake
If you’re looking for a dessert that perfectly marries creamy cheesecake with the delightful crunch of apple crisp, then this Apple Crisp Cheesecake is just what you need. It’s one of those recipes that brings back sweet memories, like cozy family gatherings and chilly fall evenings. The combination of tangy cream cheese, spiced apples, and a buttery crumble topping makes it a favorite for any occasion. Whether you’re hosting a dinner party or simply indulging after a long week, this cheesecake will surely impress.
This recipe is simple enough for busy weeknights but elegant enough to serve at special celebrations. I promise that once you take that first bite, you’ll want to share it with everyone you know!
Why You’ll Love This Recipe
- Delicious Flavor: The blend of creamy cheesecake with cinnamon-spiced apples creates a flavor explosion that’s simply irresistible.
- Simple Preparation: With straightforward steps, you’ll find making this dessert is easier than it looks!
- Versatile Treat: Perfect for holiday gatherings, potlucks, or just a cozy night in.
- Make Ahead: Bake it in advance and let it chill; it actually tastes even better the next day!
- Family Favorite: Kids and adults alike will adore this comforting dessert.
Ingredients You’ll Need
Making this Apple Crisp Cheesecake is all about using simple, wholesome ingredients. You likely have most of these in your pantry already! Here’s what you’ll need:
For the Crust
- 3 cups graham crumbs
- 3 tablespoons brown sugar
- 1/2 teaspoon cinnamon
- 1/2 cup unsalted butter (112 grams) (melted)
For the Apples
- 2 large apples (I recommend Granny Smith or Gala)
- 2 tablespoons brown sugar
- 1 1/2 teaspoons cinnamon
For the Topping
- 1/2 cup all-purpose flour (63 grams)
- 1/2 cup brown sugar (100 grams)
- 1 teaspoon cinnamon
- 1/2 cup quick oats
- 1/4 cup unsalted butter (56 grams) (melted)
For the Cheesecake Filling
- 24 ounces full-fat cream cheese (680 grams) (room temperature)
- 3/4 cup granulated sugar (150 grams)
- 1/4 cup brown sugar (50 grams)
- 1/2 teaspoon cinnamon
- 1 tablespoon cornstarch (or 2 tablespoons all-purpose flour)
- 1 teaspoon vanilla extract
- 1/2 cup sour cream (120 ml) (room temperature)
- 3 large eggs (room temperature)
Other
- boiling water (for the water bath)
- salted caramel sauce
Variations
One of the great things about this Apple Crisp Cheesecake is its flexibility! Here are some fun variations you can try:
- Add nuts: Toss in some chopped pecans or walnuts into the crumble topping for extra crunch.
- Change up the fruit: Swap out apples for sliced pears or berries for a different flavor profile.
- Make it gluten-free: Use gluten-free graham cracker crumbs and flour to accommodate dietary needs.
- Try different spices: Experiment with nutmeg or allspice for a unique twist on the classic cinnamon flavor.
How to Make Apple Crisp Cheesecake
Step 1: Prepare Your Pan
Preheat your oven to 350°F (180°C). While it’s heating up, wrap the outside of a 9-inch springform pan in tin foil. This ensures that no water seeps in during baking. I usually wrap it 3–4 times to be safe! Then lightly grease the pan with non-stick cooking spray.
Step 2: Make the Crust
In a bowl, combine graham crumbs, brown sugar, cinnamon, and melted butter. Mix until crumbly and well-combined. Press this mixture firmly into the bottom of your prepared springform pan. This crust will add an amazing texture to your cheesecake.
Step 3: Prepare the Apples
Peel and slice your apples thinly. In another bowl, toss them with brown sugar and cinnamon until they’re well coated. Set them aside so they can soak up those delicious flavors while we prepare the filling.
Step 4: Create the Topping
In yet another bowl, combine flour, brown sugar, cinnamon, quick oats, and melted butter until crumbly. This topping adds that signature crisp that pairs perfectly with creamy cheesecake!
Step 5: Make the Cheesecake Filling
In a large mixing bowl, beat room-temperature cream cheese until smooth. Gradually add granulated sugar and brown sugar until combined. Mix in cinnamon, cornstarch, vanilla extract, sour cream, and eggs one at a time until everything is blended beautifully.
Step 6: Assemble Everything Together
Pour half of your cheesecake filling over the crust in your springform pan. Layer half of your apple mixture over this filling and sprinkle half of your crumble topping on top of that. Repeat with the remaining filling, apples, and crumble topping.
Step 7: Bake!
Place your springform pan into a larger baking dish filled with boiling water—this is called a water bath to keep your cheesecake moist while baking! Bake for about 55 minutes or until set but still slightly wobbly in the center.
Step 8: Cool & Serve
Once done baking, turn off your oven and leave the cheesecake inside with the door ajar for about an hour to cool gradually. Afterward, refrigerate it for at least four hours before serving. Drizzle with salted caramel sauce right before enjoying!
Now you’ve made an incredible Apple Crisp Cheesecake that’s sure to be loved by all! Enjoy every slice!
Pro Tips for Making Apple Crisp Cheesecake
Creating the perfect apple crisp cheesecake is easier than you think! With a few helpful tips, you can ensure your dessert turns out delicious every time.
-
Choose the right apples: Using tart apples like Granny Smith or Gala not only adds a delightful contrast to the creamy cheesecake but also ensures they hold their shape during baking.
-
Room temperature ingredients: Make sure your cream cheese, sour cream, and eggs are at room temperature. This helps create a smooth batter without lumps, leading to a creamier cheesecake.
-
Don’t skip the water bath: Baking your cheesecake in a water bath prevents cracking and helps it cook evenly. It keeps the temperature stable and provides moisture during baking.
-
Let it cool completely: After baking, allow your cheesecake to cool in the pan for at least an hour before refrigerating. This step helps set the texture perfectly.
-
Chill before serving: For the best flavor and texture, chill your apple crisp cheesecake overnight. This allows all the flavors to meld beautifully and makes slicing easier.
How to Serve Apple Crisp Cheesecake
Serving apple crisp cheesecake can be just as enjoyable as making it! Here are some delightful ideas for presenting this scrumptious dessert.
Garnishes
- Whipped coconut cream: A dollop of whipped coconut cream on top adds a light and fluffy texture that complements the dense cheesecake perfectly.
- Cinnamon sprinkle: A light dusting of cinnamon over the top can enhance the aroma and visual appeal, giving that extra hint of spice.
- Fresh apple slices: Arrange thin slices of fresh apples on top for a refreshing crunch that mirrors the flavors within.
Side Dishes
- Vanilla ice cream: Creamy vanilla ice cream is a classic pairing that contrasts beautifully with the warm spices of the cheesecake.
- Caramel sauce: Drizzle some salted caramel sauce over each slice for added sweetness and richness that ties together all flavors.
- Coffee or chai tea: A warm cup of coffee or spicy chai tea complements the apple cinnamon notes while providing a comforting beverage option.
- Fruit salad: A simple fruit salad with berries or citrus can lighten up your dessert table while balancing out the richness of the cheesecake.
With these serving suggestions and pro tips, you’re all set to impress your family and friends with this heavenly apple crisp cheesecake! Enjoy every bite!
Make Ahead and Storage
This Apple Crisp Cheesecake is perfect for meal prep, allowing you to enjoy a delicious dessert without the last-minute rush. Making it in advance not only saves time but also allows the flavors to meld beautifully, enhancing the overall taste.
Storing Leftovers
- Allow the cheesecake to cool completely before storing.
- Cover the springform pan with plastic wrap or foil, or transfer slices to an airtight container.
- Store in the refrigerator for up to 5 days.
Freezing
- Once cooled, wrap the cheesecake tightly in plastic wrap and then in aluminum foil.
- Freeze for up to 2 months for best quality.
- To thaw, place it in the refrigerator overnight before serving.
Reheating
- For best results, allow the cheesecake to come to room temperature before serving.
- If you prefer it warm, heat individual slices in the microwave for about 15-20 seconds.
FAQs
Here are some common questions regarding this delightful dessert.
What makes this Apple Crisp Cheesecake special?
This Apple Crisp Cheesecake combines a rich vanilla cheesecake with spiced apples and a crunchy oatmeal topping. It’s a comforting dessert that perfectly embodies fall flavors!
Can I use different types of apples for my Apple Crisp Cheesecake?
Absolutely! While Granny Smith and Gala apples are recommended for their balance of sweetness and tartness, feel free to experiment with your favorite apple varieties for unique flavor combinations.
How do I ensure my Apple Crisp Cheesecake doesn’t crack?
To minimize cracking, be sure to bake your cheesecake in a water bath, which helps maintain moisture and temperature stability during baking.
How long does it take to prepare the Apple Crisp Cheesecake?
The total time for this recipe is about 535 minutes, which includes preparation and cooling time. However, much of that is unattended while it bakes!
Can I make this recipe gluten-free?
Yes! Substitute the graham cracker crumbs with gluten-free options and use certified gluten-free oats in your crumble topping.
Final Thoughts
I hope you find joy in making this Apple Crisp Cheesecake! Its creamy texture combined with warm cinnamon apples creates a truly comforting experience that’s perfect for sharing with loved ones. Enjoy every slice and don’t forget to top it off with some salted caramel for an extra-special treat. Happy baking!
Apple Crisp Cheesecake
Indulge in the delightful fusion of creamy cheesecake and crunchy apple crisp with this irresistible Apple Crisp Cheesecake. This dessert combines the rich flavors of tangy cream cheese, perfectly spiced apples, and a buttery oatmeal crumble topping, evoking the warmth of cozy family gatherings and chilly fall evenings. Perfect for any occasion—from festive gatherings to quiet nights in—this cheesecake is not only simple to make but also stunning enough to impress your guests. Each bite delivers a burst of flavors that will make it a family favorite.
- Prep Time: 30 minutes
- Cook Time: 55 minutes
- Total Time: 1 hour 25 minutes
- Yield: Serves 12 1x
- Category: Dessert
- Method: Baking
- Cuisine: American
Ingredients
- 3 cups graham crumbs
- 2 large apples (Granny Smith or Gala)
- 24 ounces full-fat cream cheese
- 1/2 cup sour cream
- 3 large eggs
- 1/2 cup quick oats
- Salted caramel sauce (for drizzling)
- 3 tablespoons brown sugar
- 1/2 teaspoon cinnamon
- 1/2 cup unsalted butter (melted)
- 1 1/2 teaspoons cinnamon
- 1/2 cup all-purpose flour
- 1/2 cup brown sugar
- 1 teaspoon cinnamon
- 1 tablespoon cornstarch
- 1 teaspoon vanilla extract
- boiling water (for the water bath)
- salt (to taste)
Instructions
- Preheat your oven to 350°F (180°C) and prepare a 9-inch springform pan by wrapping it in foil and greasing it.
- In a bowl, mix graham crumbs, brown sugar, cinnamon, and melted butter to form the crust. Press into the bottom of the pan.
- Toss sliced apples with brown sugar and cinnamon; set aside.
- For the topping, combine flour, brown sugar, cinnamon, quick oats, and melted butter until crumbly.
- In a separate bowl, beat cream cheese until smooth. Gradually add sugars, followed by cinnamon, cornstarch, vanilla extract, sour cream, and eggs until well blended.
- Layer half of the cheesecake filling over the crust, then half of the apple mixture and half of the crumble topping. Repeat layers.
- Bake in a water bath for about 55 minutes or until slightly wobbly in the center.
- Cool gradually in the oven before refrigerating for at least four hours or overnight.
Nutrition
- Serving Size: 1 slice (120g)
- Calories: 305
- Sugar: 22g
- Sodium: 220mg
- Fat: 14g
- Saturated Fat: 8g
- Unsaturated Fat: 5g
- Trans Fat: 0g
- Carbohydrates: 42g
- Fiber: 2g
- Protein: 4g
- Cholesterol: 98mg