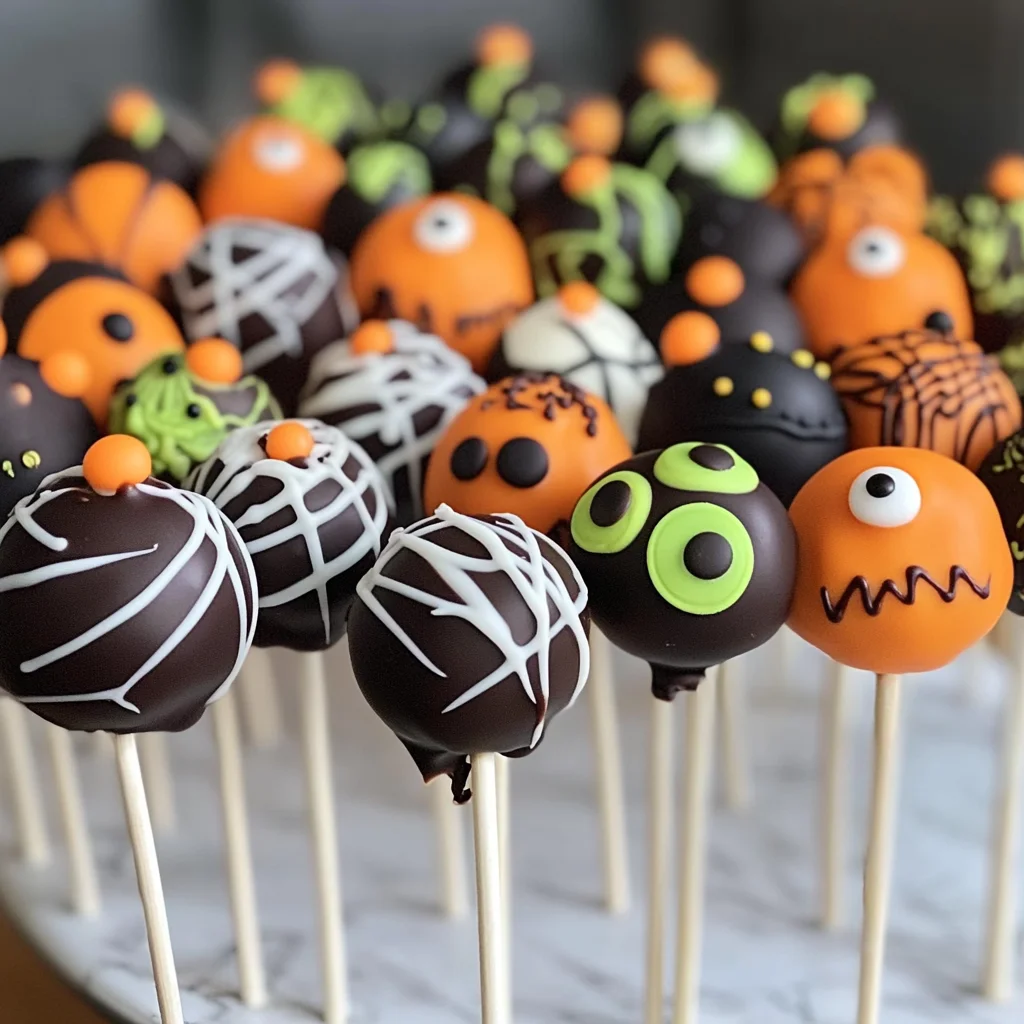
Halloween Cake Pops
If you’re looking for a fun and festive treat to celebrate the spooky season, you’ve come to the right place! These Halloween Cake Pops are a delightful way to bring some cheer to your Halloween festivities. With their tender cake and rich frosting rolled into bite-sized pops, they’re sure to be a hit at any gathering. Whether you’re hosting a party or just want to treat your family, these little delights are not only delicious but also super fun to make!
What makes this recipe special is how easy it is to customize. You can get creative with decorations, making them perfect for kids and adults alike. Plus, you can prepare them ahead of time, freeing up your schedule for all that Halloween fun!
Why You’ll Love This Recipe
- Easy Preparation: The steps are straightforward, making it a breeze even for beginner bakers.
- Family-Friendly: Kids love helping with the decorating; it’s a perfect family activity!
- Make-Ahead Convenience: You can prepare these cake pops in advance and store them until you’re ready to serve.
- Delicious Flavor: The combination of rich chocolate and creamy frosting is truly irresistible.
- Endless Customization: You can decorate them in countless spooky ways for Halloween or any occasion!
Ingredients You’ll Need
For these Halloween Cake Pops, you’ll find that the ingredients are simple and wholesome—perfect for creating delicious treats with ease. Here’s what you’ll need:
For the Cake and Frosting
- 15 ounce chocolate fudge cake mix (prepared in 9×13 dish)
- 1/2 cup butter
- 2 tablespoons shortening
- 1 cup powdered sugar
- 1/2 cup cocoa powder
- 1/2 teaspoon vanilla
- 2-3 tablespoons milk
For Decoration
- 8 ounces white candy melts
- 8 ounces orange candy melts
- 10 ounces green candy melts
- 10 ounces black candy melts
- 30 candy eyeballs
- 20 candy corn
- 10 heart sprinkles
- 40 lollipop sticks (6 inch)
- Piping bags (or you can use a ziplock bag and cut the corner)
Variations
This Halloween Cake Pops recipe is wonderfully flexible! Feel free to switch things up based on your preferences or what you have on hand.
- Try Different Flavors: Use vanilla or red velvet cake mix instead of chocolate for a unique twist.
- Switch Up the Coating: Instead of candy melts, try using white chocolate chips melted down for dipping.
- Decorate Differently: Get creative with toppings! Use crushed nuts or sprinkles instead of traditional candies.
- Make Them Festive Year-Round: Change colors and shapes according to different holidays—think pastel colors for spring!
How to Make Halloween Cake Pops
Step 1: Bake the Cake
Start by baking the cake according to package instructions in a 9×13 pan. Allow it to cool completely before moving on to the next step. This cooling time is important because it helps prevent the frosting from melting when mixed.
Step 2: Prepare the Frosting
In a large bowl, combine your butter, shortening, powdered sugar, cocoa powder, and vanilla. Add milk gradually until everything comes together nicely. Mix on high speed for about 2-3 minutes until smooth. This creamy frosting will help bind your cake pops together perfectly.
Step 3: Crumble the Cake
Once your cake has cooled, gently crumble it into fine crumbs using your hands. This step is crucial as it gives your pops that lovely texture when combined with frosting.
Step 4: Form the Cake Balls
Add small amounts of frosting into your crumbled cake mixture and mix with your hands until it holds together well enough to form balls. This should be done gradually so you don’t end up adding too much frosting.
Step 5: Insert Lollipop Sticks
Line a cookie sheet with parchment paper. Using a standard cookie scoop, form tight balls and roll them in your hands to ensure they’re compact. Dip the tips of lollipop sticks in melted candy melts before inserting them into each ball about three-quarters of the way through.
Step 6: Chill Before Decorating
Place your formed cake balls back on the lined cookie sheet and pop them into the freezer for about 30 minutes. Chilling helps set everything so that they hold their shape when dipped in chocolate.
Step 7: Decorate Your Pops
Once chilled, take out your balls and let’s have some fun decorating! Melt different colors of candy melts according to package directions and dip each pop until fully coated. Then go wild with toppings like candy eyeballs, corn, or sprinkles.
And there you have it—deliciously festive Halloween Cake Pops ready for sharing! Enjoy every spooky bite!
Pro Tips for Making Halloween Cake Pops
Creating the perfect Halloween Cake Pops is all about the details! Here are some tips to ensure your cake pops are a hit at any celebration:
-
Use Quality Ingredients: The better your ingredients, the better your cake pops will taste. Opt for high-quality chocolate melts and fresh butter for a rich flavor.
-
Allow Cake to Cool Completely: This prevents the frosting from melting when mixed in, ensuring that your cake pops hold their shape beautifully.
-
Don’t Over-Mix the Frosting: Mixing too long can lead to a dense mixture. Aim for a smooth, moist consistency that still holds together.
-
Chill Before Decorating: Chilling your cake pops helps the chocolate coating set quickly and creates a smooth finish, preventing any dripping or runny chocolate.
-
Get Creative with Decorations: Use different colors of candy melts and sprinkles to make your cake pops festive and fun! Personalizing them adds an extra touch of magic to your Halloween treats.
How to Serve Halloween Cake Pops
Serving Halloween Cake Pops is as much about presentation as it is about taste. Here are some fun ideas to make them stand out at your spooky gatherings!
Garnishes
- Edible Glitter: A sprinkle of edible glitter gives your cake pops a magical touch that catches the light beautifully.
- Chocolate Drizzle: A drizzle of contrasting melted chocolate over the top adds elegance and extra flavor.
- Colored Sprinkles: Use themed sprinkles such as orange, black, or purple to enhance their Halloween appeal.
Side Dishes
- Pumpkin Spice Cupcakes: These cupcakes bring in the seasonal flavor of pumpkin spice, making them a delightful complement to your cake pops.
- Ghostly Marshmallow Treats: Made with marshmallows and rice cereal, these treats can be shaped into ghost figures, adding fun variety to your dessert table.
- Witch’s Brew Fruit Punch: A refreshing fruit punch can cool down those enjoying sweets without being overly sugary.
- Crispy Apple Slices: Serve with caramel or peanut butter dip for a fresh contrast alongside the sweetness of cake pops; they provide a crunchy texture that balances well.
Now that you have all these tips and serving suggestions, you’re ready to impress everyone at your next Halloween party with these delightful treats! Enjoy creating and sharing this sweet delight!

Make Ahead and Storage
These Halloween Cake Pops are not only fun to make but also perfect for meal prep! You can easily whip up a batch ahead of time, making them a convenient treat for your Halloween festivities. Here’s how to keep them fresh and ready for the party!
Storing Leftovers
- Store any leftover cake pops in an airtight container at room temperature for up to 3 days.
- If you prefer, you can refrigerate them for up to a week; just ensure they’re in a sealed container to prevent drying out.
Freezing
- To freeze cake pops, first, allow them to cool completely and then place them on a baking sheet in a single layer.
- Once frozen solid, transfer them into a freezer-safe bag or container, separating layers with parchment paper.
- They can be stored in the freezer for up to 3 months. When you’re ready to enjoy, let them thaw at room temperature.
Reheating
- Cake pops are best enjoyed cold or at room temperature; however, if you prefer them slightly warmed, you can microwave them for about 10 seconds.
- Be cautious not to overheat as this may cause the chocolate coating to melt or become too soft.
FAQs
Here are some common questions about making Halloween Cake Pops:
Can I use different cake flavors for Halloween Cake Pops?
Absolutely! Feel free to experiment with any flavor of cake mix that you enjoy. Chocolate fudge is delicious, but vanilla or red velvet would work great too!
How do I get my Halloween Cake Pops to look professional?
To achieve that polished look, ensure your cake balls are uniform in size. Additionally, dipping the pops in melted candy melts should be done smoothly. Don’t forget to tap off excess chocolate before decorating!
Can I customize the decorations on my Halloween Cake Pops?
Yes! Get creative with your decorations! Use sprinkles, edible glitter, or even themed candies like gummy bats or spiders to give each pop a unique flair.
How long do Halloween Cake Pops last?
When stored properly at room temperature, they last about 3 days. In the fridge, they can last up to a week. For longer storage, opt for freezing!
Final Thoughts
I hope this recipe brings joy and sweetness to your Halloween celebrations! These adorable Halloween Cake Pops are sure to be a hit with family and friends alike. Enjoy the process of creating these delightful treats and don’t hesitate to get creative with your designs. Happy baking and have a spook-tacular time!
Halloween Cake Pops
Get ready to celebrate Halloween with these delightful Halloween Cake Pops! These sweet treats combine tender cake and creamy frosting, rolled into bite-sized balls, making them a perfect addition to any festive gathering. Fun to decorate and easy to customize, they are a fantastic project for the whole family. Whether you’re hosting a spooky party or simply want to treat your loved ones, these colorful cake pops are sure to be a hit. Plus, you can prepare them in advance, allowing you more time to enjoy all the Halloween festivities!
- Prep Time: 30 minutes
- Cook Time: 25 minutes
- Total Time: 55 minutes
- Yield: Approximately 24 servings 1x
- Category: Dessert
- Method: Baking
- Cuisine: American
Ingredients
- 15 ounce chocolate fudge cake mix
- 1/2 cup butter
- 2 tablespoons shortening
- 1 cup powdered sugar
- 1/2 cup cocoa powder
- 1/2 teaspoon vanilla extract
- 2–3 tablespoons milk
- 8 ounces white candy melts
- 8 ounces orange candy melts
- 10 ounces green candy melts
- 10 ounces black candy melts
- 30 candy eyeballs
- 20 candy corn
- 10 heart sprinkles
- 40 lollipop sticks (6 inch)
- Piping bags (or you can use a ziplock bag and cut the corner)
Instructions
- Bake the chocolate fudge cake mix in a 9×13 pan according to package instructions and let it cool completely.
- In a bowl, mix butter, shortening, powdered sugar, cocoa powder, and vanilla extract until smooth. Gradually add milk until desired consistency is reached.
- Crumble the cooled cake into fine crumbs and combine with frosting until well mixed.
- Roll into uniform balls and insert lollipop sticks dipped in melted candy melts.
- Freeze for about 30 minutes, then dip each pop in melted candy melts and decorate as desired.
Nutrition
- Serving Size: 1 serving
- Calories: 150
- Sugar: 18g
- Sodium: 50mg
- Fat: 7g
- Saturated Fat: 4g
- Unsaturated Fat: 2g
- Trans Fat: 0g
- Carbohydrates: 20g
- Fiber: 0g
- Protein: 1g
- Cholesterol: 10mg