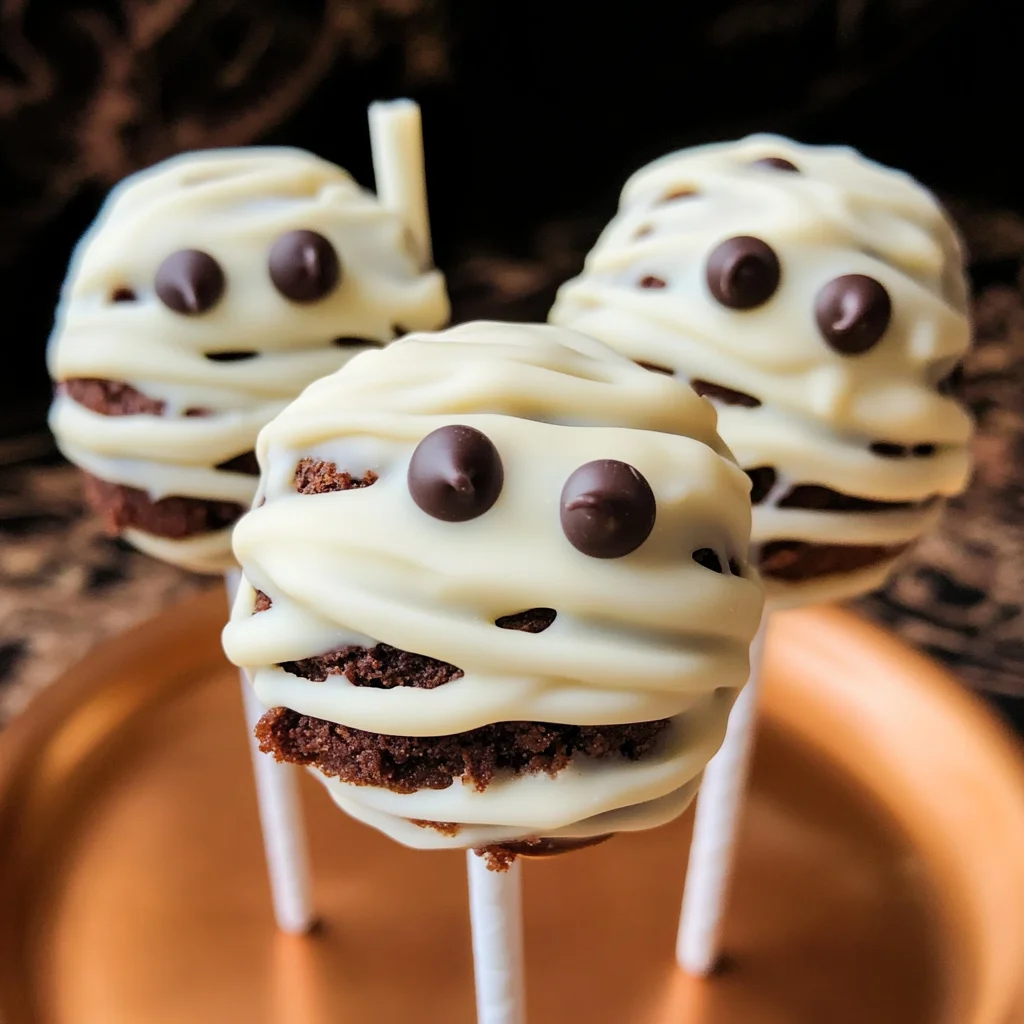
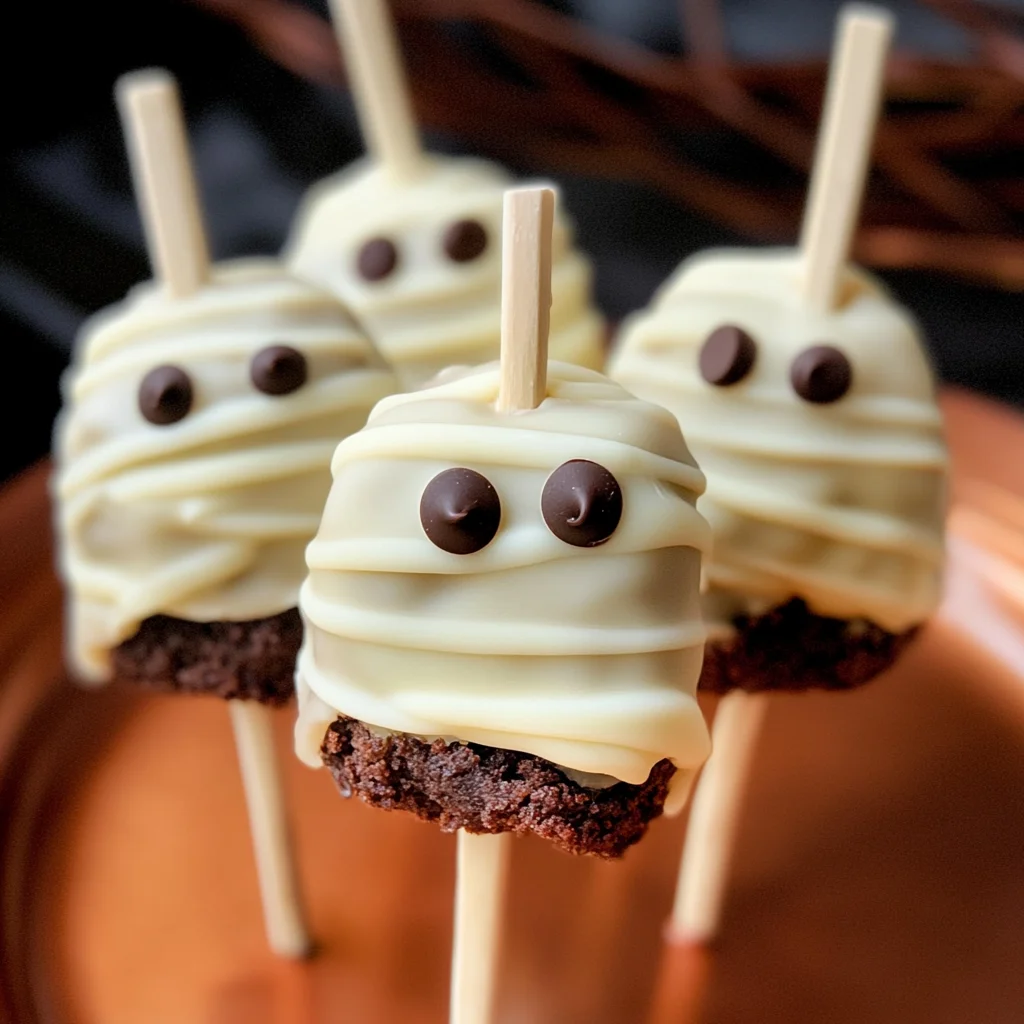
Mummy Pops
If you’re looking for a fun and delicious treat to celebrate Halloween, then you’re in for a treat with these Mummy Pops! These delightful little bites are not only a hit with kids but also bring out the inner child in adults. Made with fudgy dark chocolate brownies and creamy cheese, all dipped in sweet white chocolate, they’re perfect for parties, family gatherings, or even just a cozy night in. Trust me; once you make these Mummy Pops, they will quickly become a seasonal favorite!
These pops are incredibly easy to whip up and can be prepared ahead of time, making them a great option for busy days leading up to Halloween. Plus, their adorable mummy appearance will surely bring smiles to everyone’s faces!
Why You’ll Love This Recipe
- Family-friendly fun: Kids love getting involved in the kitchen, and shaping these Mummy Pops is a great way to bond!
- Deliciously indulgent: The combination of rich brownies and creamy cheese makes every bite heavenly.
- Make-ahead convenience: Prepare the brownie mix a day before and freeze the pops until you’re ready to serve.
- Creative presentation: Decorating your Mummy Pops is half the fun! Let your creativity shine as you drizzle on that white chocolate.
Ingredients You’ll Need
Let’s gather some simple, wholesome ingredients to create these spooky treats! Most of these items are likely already in your pantry or easy to find at your local store.
For the Brownies
- 1 (17.8-ounce) box Betty Crocker supreme triple chunk brownie mix
- 1 large egg
- 1/4 cup water
- 1/3 cup canola oil
- Cooking spray
For the Filling and Coating
- 4 ounces cream cheese
- 3 cups white chocolate chips (or 18 ounces of a white chocolate bar)
- 30 mini chocolate chips
Variations
This recipe is wonderfully flexible! You can easily adapt it to suit your taste or dietary needs. Here are some fun ideas:
- Switch up the fillings: Instead of cream cheese, try using peanut butter or almond butter for a nutty twist.
- Add flavor: Mix in some vanilla extract or espresso powder into the brownie batter for an extra flavor boost.
- Go colorful: Use colored candy melts instead of white chocolate for a festive look that matches any holiday color scheme.
- Make them gluten-free: Use gluten-free brownie mix to ensure everyone can enjoy these delicious treats!
How to Make Mummy Pops
Step 1: Prepare the Brownie Mix
Start by preparing the brownie mix according to the package instructions. It’s essential to follow this step closely, as it forms the base of our Mummy Pops. Once baked, let them cool completely so we can easily shape them later.
Step 2: Bake Until Perfect
Preheat your oven to 350 degrees F. Spray a baking pan with cooking spray before pouring in your brownie mixture. Bake until the edges are crispy and the center is set—this usually takes about 26-31 minutes. Once done, allow them to cool before proceeding.
Step 3: Create the Dough
After letting your brownies cool, remove them from the pan and place them into a food processor. Don’t forget those crispy edges—they’re perfect for snacking while you work! Add cream cheese and pulse until everything comes together into a dough-like consistency.
Step 4: Shape Your Pops
Now it’s time for some fun! Line a baking sheet with parchment paper and scoop out portions of dough using a tablespoon. Roll them into balls and place them on the sheet. Cut paper straws in half and insert them into each ball before freezing them for at least one hour (or overnight if you prefer).
Step 5: Dip in White Chocolate
Once your pops are frozen solid, melt your white chocolate according to package instructions. Dip each pop thoroughly so that they’re coated all around—this gives them that classic mummy look! Place each pop back on the baking sheet as you go.
Step 6: Decorate Your Mummy Pops
Here comes the creative part! Drizzle more melted white chocolate over each pop to mimic mummy wrappings. Then add two mini chocolate chips on top as eyes—so cute! Keep your finished pops covered in the refrigerator until it’s time to serve.
Enjoy making these delightful Mummy Pops—they’re sure to be a hit at any gathering!
Pro Tips for Making Mummy Pops
Creating the perfect Mummy Pops is all about a few key techniques that will ensure they turn out delicious and adorable. Here are some tips to help you along the way!
-
Use quality chocolate: Opt for high-quality white chocolate chips for dipping; they melt smoother and create a shinier finish, making your mummy pops look more appealing.
-
Chill thoroughly: Freezing the brownie balls before dipping ensures they hold their shape and makes it easier to coat them in chocolate without falling apart.
-
Drizzle with finesse: When drizzling white chocolate for the mummy effect, use a fork or piping bag to control the flow. This gives a more realistic mummy appearance!
-
Experiment with flavors: Feel free to add extracts like vanilla or almond to the brownie mix for an extra layer of flavor that complements the sweetness of the white chocolate.
-
Get creative with eyes: Instead of mini chocolate chips, try using edible candy eyes or even colored sprinkles for a fun twist that adds character to your mummy pops.
How to Serve Mummy Pops
These charming Mummy Pops are sure to be a hit at any Halloween gathering! They can be elegantly presented in various ways, making them not only delightful treats but also impressive decorations.
Garnishes
- Edible glitter: Sprinkle some edible glitter over the white chocolate once it’s set for a magical touch that catches the light.
- Fresh mint leaves: Adding a few fresh mint leaves on the plate beside each pop brings a pop of color and freshness that contrasts beautifully with the sweet treats.
Side Dishes
- Fruit platter: A colorful assortment of fresh fruits like strawberries, grapes, and melon balances out the sweetness while providing a refreshing contrast.
- Caramel dip: Serve with a warm caramel dip on the side for those who want an extra indulgent experience. The rich flavor pairs wonderfully with the sweetness of the pops.
- Popcorn: Offer some spooky-themed popcorn (think orange and black kernels) as a crunchy side that guests can munch on between bites of their mummy pops.
- Cheese board: A selection of assorted cheeses accompanied by crackers provides savory options that round out your dessert table perfectly.
With these serving ideas and pro tips, your Mummy Pops are bound to be a delightful centerpiece at any Halloween festivity! Enjoy making them as much as everyone will enjoy eating them!
Make Ahead and Storage
These Mummy Pops are perfect for meal prep! You can make them ahead of time, allowing you to enjoy the spooky treats whenever you’re ready to indulge. Here’s how to keep them fresh and delicious:
Storing Leftovers
- Store any leftover Mummy Pops in an airtight container in the refrigerator.
- They will stay fresh for up to 5 days.
Freezing
- If you want to prepare them further in advance, freeze the pops before dipping in white chocolate.
- Wrap each pop individually in plastic wrap, then place them in a freezer-safe bag or container.
- They can be frozen for up to 3 months. Just thaw in the refrigerator before dipping.
Reheating
- There’s no need to reheat Mummy Pops; they are best enjoyed chilled straight from the fridge!
- If you have un-dipped brownie balls, you can let them sit at room temperature for about 10-15 minutes before dipping.
FAQs
Here are some common questions that arise when making Mummy Pops:
Can I use milk chocolate instead of white chocolate for Mummy Pops?
Absolutely! While white chocolate provides that classic mummy look, feel free to get creative with milk chocolate or any other coating you prefer.
How do I make my Mummy Pops look spooky?
To enhance the spooky factor of your Mummy Pops, consider adding edible eyes or even sprinkles after drizzling with white chocolate!
How long do Mummy Pops last?
Mummy Pops will last up to 5 days in the refrigerator if stored properly. They are a great treat for a Halloween party or just a fun dessert!
Can I customize the filling for Mummy Pops?
Yes! You can mix in different ingredients like crushed cookies or nuts into the brownie mixture if you’d like to add variety.
What is the best way to dip my pops without losing their shape?
To maintain their shape while dipping, ensure your brownie balls are well-frozen. Also, work quickly when dipping so that the chocolate sets nicely around each pop.
Final Thoughts
Making these Mummy Pops is not only a fun activity but also a delightful way to celebrate Halloween with family and friends! I hope you enjoy creating these spooky treats as much as I do. Don’t hesitate to get creative with decorations and flavors—after all, it’s all about having fun! Happy baking!
Mummy Pops

Create spooktacular Mummy Pops for Halloween! These delightful treats are a fun and easy way to celebrate the season, perfect for kids and adults alike. Made with fudgy brownies combined with creamy cheese, all coated in sweet white chocolate, these pops are as tasty as they are adorable. Their charming mummy appearance will bring smiles at any gathering, making them a must-have for your Halloween festivities. Plus, they’re simple to prepare ahead of time, allowing you to enjoy your party without stress.
- Prep Time: 20 minutes
- Cook Time: 30 minutes
- Total Time: 50 minutes
- Yield: Approximately 12 Mummy Pops 1x
- Category: Dessert
- Method: Baking
- Cuisine: American
Ingredients
- 1 (17.8-ounce) box brownie mix
- 1 large egg
- 1/4 cup water
- 1/3 cup canola oil
- 4 ounces cream cheese
- 3 cups white chocolate chips
- Cooking spray
Instructions
- Preheat the oven to 350°F and prepare a baking pan with cooking spray.
- Mix the brownie ingredients according to the package instructions and bake for 26-31 minutes. Cool completely.
- Once cooled, crumble brownies into a food processor and blend with cream cheese until combined.
- Roll the mixture into balls and insert half paper straws into each. Freeze for at least one hour.
- Melt white chocolate and dip each frozen pop until fully coated.
- Drizzle additional melted white chocolate over each pop for mummy wrappings and top with mini chocolate chips for eyes.
Nutrition
- Serving Size: 1 serving
- Calories: 180
- Sugar: 16g
- Sodium: 45mg
- Fat: 9g
- Saturated Fat: 5g
- Unsaturated Fat: 4g
- Trans Fat: 0g
- Carbohydrates: 23g
- Fiber: 1g
- Protein: 2g
- Cholesterol: 15mg