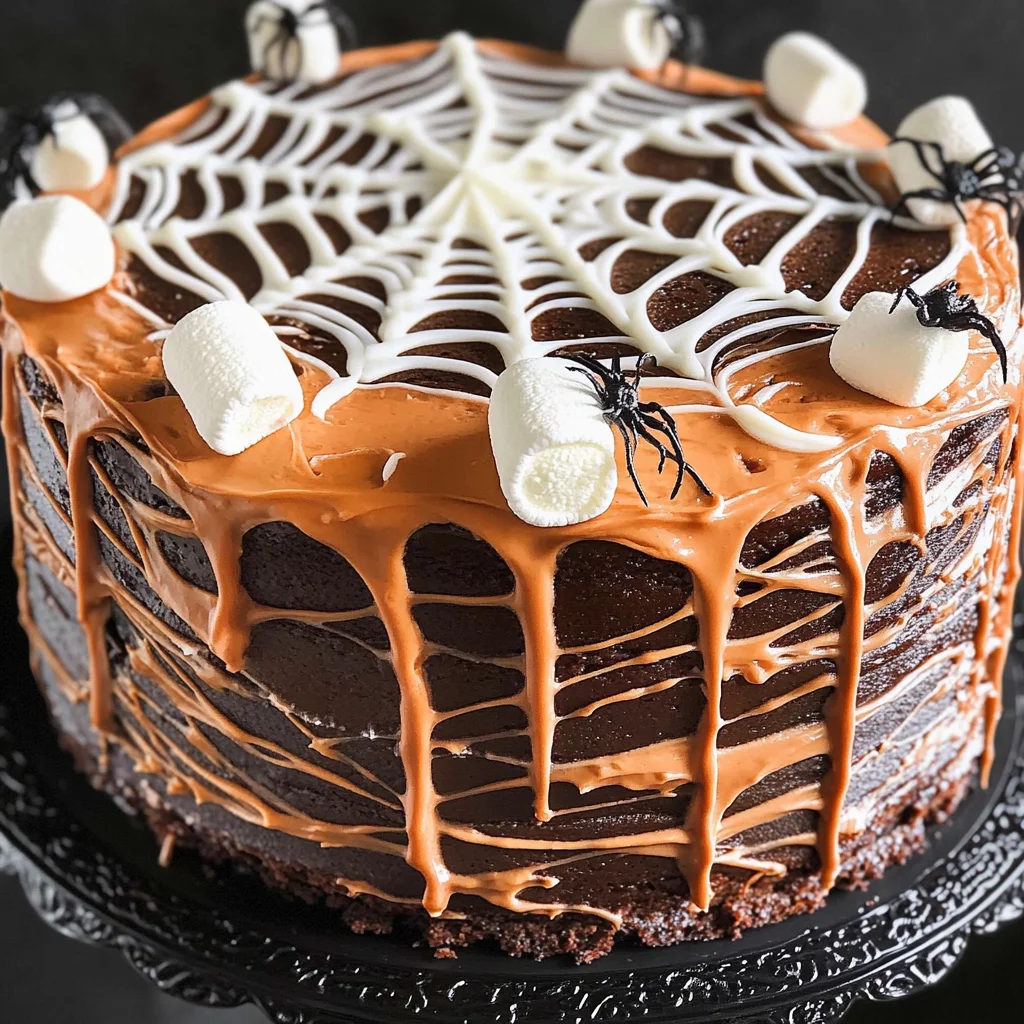
Spiderweb Cake
If you’re looking for a show-stopping dessert that will make your Halloween party unforgettable, this Spiderweb Cake is just the ticket! With rich chocolate layers, creamy frosting, and a spooky marshmallow web on top, it’s both delicious and fun. This cake is perfect for family gatherings or any festive occasion when you need something that impresses without requiring hours in the kitchen.
What makes this Spiderweb Cake so special is its versatility. Whether you’re using all-purpose flour, whole wheat flour, or even gluten-free options, this cake adapts beautifully. Plus, it’s a great way to get everyone involved in the kitchen—kids love helping out with the decorating!
Why You’ll Love This Recipe
- Easy to Make: This recipe is surprisingly simple, making it perfect for bakers of all skill levels.
- Family-Friendly Fun: Everyone loves a good chocolate cake, and the spiderweb adds a whimsical touch that kids will adore!
- Make-Ahead Convenience: Bake the layers ahead of time and frost them when you’re ready—perfect for busy schedules!
- Deliciously Rich Flavor: The combination of Dutch-process cocoa and black cocoa gives this cake an indulgent chocolate flavor that will have everyone coming back for seconds.
- Customizable Options: Adjust the flavors and decorations to suit any occasion—make it as spooky or as festive as you like!
Ingredients You’ll Need
Let’s gather some simple, wholesome ingredients to create our Spiderweb Cake! You may already have many of these items in your pantry. Here’s what you’ll need:
For the Cake
- 3 cups granulated sugar
- 2 1/2 cups + 2 tablespoons flour (see notes)
- 3/4 cup + 2 tablespoons Dutch-process cocoa powder
- 1/4 cup black cocoa powder (or more Dutch-process cocoa)
- 1 1/2 teaspoons baking powder
- 1 1/2 teaspoons baking soda
- 1 1/2 teaspoons salt
- 3 large eggs (each 50 grams out of shell, room temp, or use chia eggs – see notes)
- 1 1/2 cups milk (see notes)
- 3/4 cup olive oil (or canola/vegetable oil)
- 1 tablespoon vanilla extract
- 1 cup + 2 tablespoons boiling water
For the Frosting
- 24 ounces full-fat cream cheese (room temperature, see notes)
- 1 cup + 2 tablespoons unsalted butter
- 3 3/4 cups powdered sugar (or more if you like)
- 1 1/2 teaspoons vanilla extract
- pinch of salt
For Decoration
- orange gel food coloring (see notes)
- 2 cups mini vegan marshmallows (see notes)
- plastic spiders
Variations
This Spiderweb Cake is wonderfully flexible! Feel free to play around with flavors and decorations to make it your own.
- Change the Flour: Use whole wheat flour or gluten-free flour for a different texture while keeping it delicious.
- Swap the Sweetener: Try using coconut sugar or maple syrup for a unique flavor twist in both the cake and frosting.
- Add Some Zest: Incorporate orange or lemon zest into the batter or frosting for a refreshing citrus kick.
- Go Nuts: Sprinkle chopped nuts in between layers for an added crunch and flavor contrast.
How to Make Spiderweb Cake
Step 1: Prepare Your Baking Pans
Start by greasing your baking pans with a little oil or butter. This helps ensure that your cake layers come out easily once baked. Preheat your oven to 350°F (175°C) so it’s nice and hot when you’re ready to bake.
Step 2: Mix Dry Ingredients
In a large mixing bowl, whisk together the granulated sugar, flour, Dutch-process cocoa powder, black cocoa powder, baking powder, baking soda, and salt. Mixing these dry ingredients thoroughly ensures even distribution of flavors throughout your cake.
Step 3: Combine Wet Ingredients
In another bowl, combine the eggs (or chia eggs), milk, olive oil, and vanilla extract. Whisk until well blended. Adding wet ingredients separately helps maintain proper mixing without overworking the batter.
Step 4: Combine Everything
Pour your wet ingredients into the dry mixture along with boiling water. Stir gently until just combined; it’s okay if there are a few lumps left! The boiling water helps activate the cocoa flavors and creates a moist cake.
Step 5: Bake
Divide your batter evenly among prepared pans. Bake in your preheated oven for about 24 minutes or until a toothpick inserted into the center comes out clean. Let them cool in pans before transferring them onto wire racks.
Step 6: Make the Frosting
In a large bowl, beat together softened cream cheese and butter until smooth. Gradually add powdered sugar while mixing on low speed until combined. Then mix in vanilla extract and salt until everything is fluffy and creamy!
Step 7: Assemble Your Cake
Once your layers are completely cool, place one layer on your serving plate. Spread a generous layer of frosting on top before adding another layer. Repeat with remaining layers until stacked.
Step 8: Create Your Spiderweb
Use orange gel food coloring mixed with some frosting to pipe spiderweb designs over the top layer of frosting. Finish off by scattering mini vegan marshmallows on top along with some plastic spiders for that perfect spooky touch!
And there you have it—your very own Spiderweb Cake! Enjoy every slice at your next gathering; I promise everyone will be asking for seconds!
Pro Tips for Making Spiderweb Cake
Making a spiderweb cake can be a delightful experience, especially with these helpful tips to ensure everything turns out perfectly!
-
Sift Your Dry Ingredients: Sifting flour and cocoa powder together not only helps eliminate lumps but also aerates the mixture, resulting in a lighter and fluffier cake.
-
Room Temperature Ingredients: Using room temperature eggs and cream cheese will help your batter mix more evenly, creating a smooth texture for both the cake and frosting.
-
Boiling Water Trick: Adding boiling water to your batter enhances the chocolate flavor and creates a moist cake. Just remember to be cautious while mixing!
-
Chill Your Frosting: If your cream cheese frosting is too soft to spread, chilling it for about 15-20 minutes can make it easier to work with and will hold its shape better when decorating.
-
Creative Web Design: To create the spiderweb effect, use a piping bag with a small round tip. Practice on parchment paper first if you’re unsure; it’s all about having fun!
How to Serve Spiderweb Cake
This spooky spiderweb cake is not only delicious but also visually striking, making it perfect for Halloween parties or festive gatherings. Here are some ideas on how to present this delightful dessert.
Garnishes
- Edible Glitter: A sprinkle of edible glitter can add a magical touch, making your cake sparkle under the party lights.
- Fresh Berries: Serve slices with fresh raspberries or strawberries on the side. Their tartness balances the sweetness of the cake beautifully.
- Mint Leaves: A few fresh mint leaves on each plate can add a pop of color and a refreshing aroma that complements the rich chocolate flavor.
Side Dishes
-
Pumpkin Spice Cookies: These soft and flavorful cookies are perfect for fall and provide a lovely contrast in texture alongside the moist cake.
-
Apple Crisp: Warm apple crisp with cinnamon pairs wonderfully with the richness of the spiderweb cake, offering a cozy autumn vibe.
-
Vanilla Ice Cream: A scoop of vanilla ice cream drizzled with chocolate sauce enhances the chocolate layers while adding a creamy element that everyone loves.
-
Caramel Pudding: This rich dessert adds an extra layer of indulgence and pairs well with the spiderweb design—perfect for those who adore sweet treats!
Feel free to mix and match these serving suggestions to create an unforgettable dessert experience that will delight guests young and old alike! Enjoy baking, presenting, and sharing your spooky masterpiece!
Make Ahead and Storage
This Spiderweb Cake is perfect for meal prep and can easily be made ahead of time. Whether you’re planning a spooky gathering or just want to enjoy a delicious dessert throughout the week, here’s how you can store and manage this cake.
Storing Leftovers
- Keep leftover slices of Spiderweb Cake in an airtight container at room temperature for up to 3 days.
- For longer storage, place the cake in the refrigerator where it will stay fresh for up to 5 days.
- If you’re concerned about the frosting, you can cover it with plastic wrap to maintain its texture.
Freezing
- Slice the cake into individual portions to make it easier to thaw later.
- Wrap each slice tightly in plastic wrap, then place them in a freezer-safe bag or container.
- The cake can be frozen for up to 3 months—just remember to label the bags with the date!
Reheating
- To reheat individual slices, simply microwave them for about 10-15 seconds until warm.
- If you prefer a warm slice without a microwave, let it sit at room temperature for about 30 minutes before enjoying.
FAQs
Got questions? You’re not alone! Here are some common queries about making this delightful Spiderweb Cake.
Can I make a gluten-free Spiderweb Cake?
Absolutely! You can substitute all-purpose flour with your favorite gluten-free flour blend. Just ensure that it has a good binding agent so your cake holds together beautifully.
What makes the Spiderweb Cake so special?
The combination of rich chocolate layers paired with creamy frosting creates a decadent treat. Plus, the vegan marshmallow web adds a fun and spooky twist that’s perfect for Halloween!
How do I decorate my Spiderweb Cake?
You can use orange gel food coloring mixed into your cream cheese frosting to create the spiderweb effect. Pipe it on top of the cake, and don’t forget those cute plastic spiders for an extra fright!
Final Thoughts
I hope you find joy in creating this whimsical Spiderweb Cake! It’s not only delicious but also a fantastic centerpiece for any Halloween celebration or cozy get-together. I encourage you to try making it yourself—you’ll love how easy and fun it is. Happy baking, and may your kitchen be filled with laughter and sweet treats!
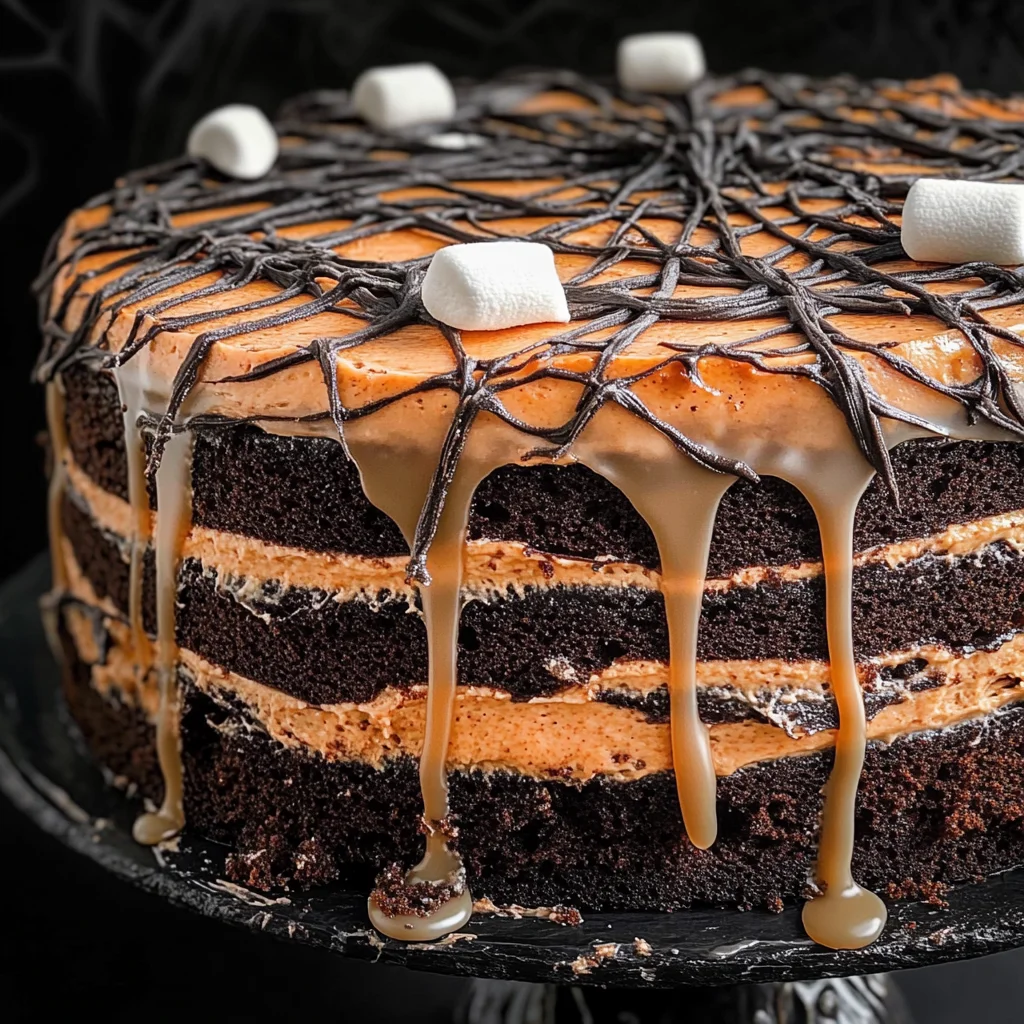
Spiderweb Cake
If you’re looking for a standout dessert to make your Halloween festivities memorable, this Spiderweb Cake is the perfect choice. With its rich chocolate layers and creamy frosting, this cake dazzles both the eyes and the taste buds. Topped with a playful spiderweb made from vegan marshmallows, it’s a fun treat that everyone will love. Plus, it’s easy to whip up, making it a wonderful project for families to tackle together. Whether you’re celebrating Halloween or just want a delightful dessert, this cake fits the bill!
- Prep Time: 30 minutes
- Cook Time: 24 minutes
- Total Time: 54 minutes
- Yield: Serves approximately 12 slices 1x
- Category: Dessert
- Method: Baking
- Cuisine: American
Ingredients
- 3 cups granulated sugar
- 2 1/2 cups flour (or gluten-free flour)
- 3/4 cup Dutch-process cocoa powder
- 1/4 cup black cocoa powder
- 1 1/2 teaspoons baking powder
- 1 1/2 teaspoons baking soda
- 1 1/2 teaspoons salt
- 3 large eggs (or chia eggs)
- 1 1/2 cups milk (or plant-based milk)
- 3/4 cup olive oil
- 1 tablespoon vanilla extract
- 1 cup + 2 tablespoons boiling water
- 24 ounces cream cheese (room temperature)
- 1 cup + 2 tablespoons unsalted butter
- 3 3/4 cups powdered sugar (or more if you like)
- 1 1/2 teaspoons vanilla extract
- Pinch of salt
- orange gel food coloring
- 2 cups mini vegan marshmallows
- plastic spiders
Instructions
- Preheat oven to 350°F (175°C) and grease your baking pans.
- In a bowl, whisk together sugar, flour, cocoa powders, baking powder, baking soda, and salt.
- In another bowl, combine eggs (or chia eggs), milk, olive oil, and vanilla extract.
- Mix wet ingredients into dry ingredients along with boiling water until just combined.
- Pour batter into prepared pans and bake for about 24 minutes. Cool layers completely.
- For frosting, beat cream cheese and butter; gradually mix in powdered sugar and vanilla.
- Stack cake layers with frosting in between; decorate with orange gel frosting for the spiderweb effect and top with vegan marshmallows.
Nutrition
- Serving Size: 1 slice - approximately 100g
- Calories: 450
- Sugar: 60g
- Sodium: 200mg
- Fat: 22g
- Saturated Fat: 6g
- Unsaturated Fat: 16g
- Trans Fat: 0g
- Carbohydrates: 63g
- Fiber: 3g
- Protein: 5g
- Cholesterol: 50mg